You should still have enough sidings to use to build a door. Make good use of the remaining materials to construct a door. Why not get creative and make a door that looks like a piece of art work.
Since you have already covered previous sections of constructing the shed foundation, back side wall frame, front side wall frame, the shorter side wall frames, constructing roof frame, installing sidings and installing roof shingles, the building is complete.

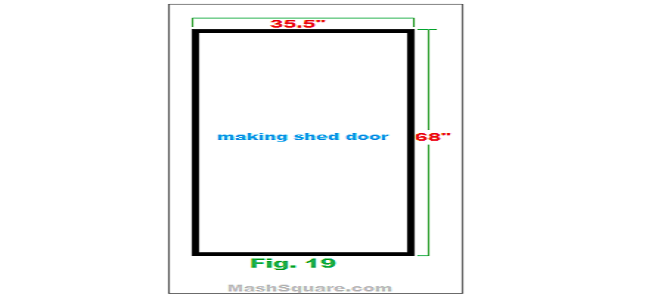
Enough talk, let us get to work. The door opening should be 36-inch. Referring to Fig. 19, the door width should be 35.5-inch, leaving ~ 1/4-inch gap all around the door with exception to the bottom part of the door which should extend longer than shed floor.
Materials needed (for both sides):
- 6 (1-in x 6-in x 6-ft) – weather treated.
- Weather proof siding plates.
Using the weather proof siding, measure and cut the plate to the exact width and length as Fig. 19. Make good use of the left over sidings and cut couple more pieces that be used to double the door. The first piece you caught will be used for the front side of the door while the other two pieces can be used on the back of the door, since they won’t be visual from the outside anyways.
 Cut two of the weather treated wood (1-in x 6-in x 6-ft) to a length of 68″ each.
Using the same type of wood, cut three pieces to a length of 23.5″ each.
Now that put the pieces all together similar to Fig. 20. It is preferable to use screws not nails.
 Once you are done making the custom door, next step is to install two additional (1-in x 6-in x 6-ft) wood along both sides of the door frame as shown on Fig. 21. Make sure to level them correctly because they will be used for door hinges and door latch. The other piece that goes on top of the door is more like a decorative piece but would also prevent rain water from going inside the shed.
Now install door using shed/barn door hinges. Also, you will need to add door latch once you have tested that the door was installed correctly. Open and close few times to see how it works and if any adjustment is needed before installing sliding door latch.
The only thing remaining is the window and ramp. However, building a ramp should be easy to figure out at this point. If you have any question, feel free to ask.
Click here to see compiled drawings of all figures used to build the shed custom door.

Before building the door, let us first finish the front side siding. Simply cut weather proof sidings plates to fit the front side, leaving only the door opening. Do not worry about the window for now, we’ll go over it later.
Now that you have completed the foundation, back side wall, front side wall, the rest of the sides , framed the roof and installed the roof plywood and shingles, you are pretty much done with your shed project. Let’s utilize the remaining sidings to make custom built door.

 Obviously, we can not install roof shingles before first installing plywood on the roof. Cut 4-ft x 8-ft plywood to the length needed. Install them on the roof frame using mix of screws and/or nails.
Once done installing roof plywood, installing shingles on such a small roof is probably the easiest part of the building process. However, before doing so, shingles underlayment needs to be installed first.
It is assumed that you have already covered the instructions to build the foundation, back side wall, front side wall, the rest of the sides and finished constructing roof frame at this point.
Make sure underlayment layers overlap to prevent possible water leakage if any of the shingles get damaged over time.
Start the underlayment from the lowest edge of the roof. Secure the first layer to the roof plywood using Hammer Tacker Stapler or Steel Stapler. Once you have stapled the first layer, run the second layer and make sure they overlap at least 6-inch, wherein the second layer overlaps on top of the first layer.

Once you are done with the underlayment, start installing the roof shingles. It is very important to start shingling from the lowest edge of the roof too as shown on the picture to the left. Continue installing the shingles till you reach the highest peak of the roof.
When you are done with front side of the roof, follow exactly same procedure to install shingles on the back side.
 You should have access shingles hanging down for the sides, simply take a utility knife and cut them, forming straight line if possible. It looks much more neater if caught straight.
As you can probably tell from the picture to the right that the shingling of the peak area has not been completed yet.
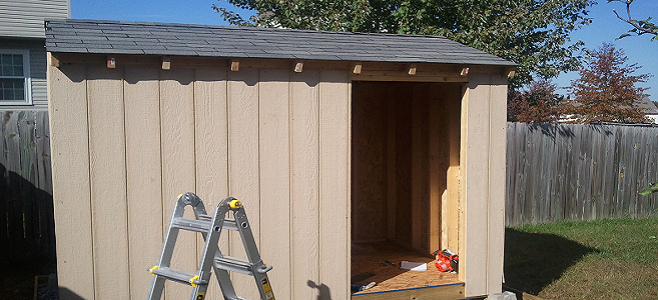
Your shed should look something like this picture, with only the front side remaining. Let us finish installing the front side siding and then build a custom door.
 The hardest part of the shed project is constructing the building frame. It is time consuming and required a lot of measuring, leveling and wood cutting. Since you have already completed constructing the foundation, back side wall framing, front side wall framing, the shorter side framing and constructing roof frame, the rest of the tutorial should be straight forward.
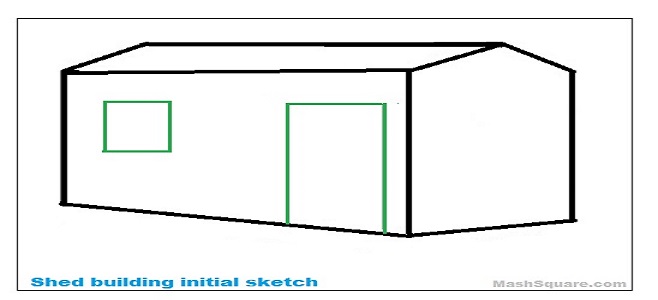
Your completed project should look something like the figure to the left.
- Using the (4-ft x 8-ft) weather treated sidings, cut them as needed and install them on all sides except the front side.
- Using screws is recommended to insure you do not damage the sidings.
Now, let us install the roof plywood and shingles then complete the front side siding once the roof is completed. That way if it rains, the interior side of the wood do not get damaged especially the flooring plywood.
Hang in there tight! You’re almost there. Before referring to any figure, let us crunch some numbers. Not really but you will need to so some calculation to figure the roof pitch. Luckily, there are many websites out there that do such calculations.
It is assumed that you have already covered the instructions to construct foundation, back side wall, front side wall and the rest of the sides by now.
It is not recommended to have steep slope. The roof pitch that was used for this shed is 4/12. What that means is a rise of 4-inch every 12-inch of the building width. In our case, the rise was 12-inch and the run was 36-inch (3-ft), resulting the following:
- Angle of 18.4°
- Rafter of 37.9-inch (used 48 inches)
You are probably wondering what do those numbers mean? And why do we need them? Great questions. Well, you need the angle to cut the roof joists so they can fit correctly when constructing the roof frame. Using the Miter saw, adjust the angle to 18.4°. Using the 2-in x 4-in x 8-ft studs, mark all nine studs at 48-inch (4-ft) (exactly in the middle) and cut all of them.
Materials needed (same materials):
- 9 (2-in x 4-in x 8-ft) – standard wood
- 1 (2-in x 4-in x 10-ft) – standard wood
- Corner metal braces – optional
 After you cut the studs to the recommended length, use the 10-inch stud to secure the end rafters to it. Unfortunately, you can not build the entire roof frame on a flat surface with exception to the four end rafters as shown on picture. The rest of the rafters should be added to the roof once corner ends are secured and leveled too.
It is best and easier to use metal braces to attach the roof frame to the building.
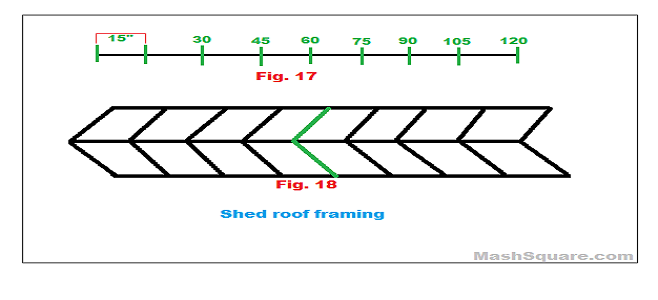
 Once the 10-ft rafters support stud is secured, continue installing the rest of the rafters as shown on Fig. 18 and in accordance with spaces shown on Fig. 17.
Whether you use screws or nails, it is up to you but you should probably use screws for the first few rafters.
The hardest part is over with! If you did everythign correctly, you should have a great looking bare frame at point.
See a compiled full-size figure used for framing the roof, or continue to installing sidings.