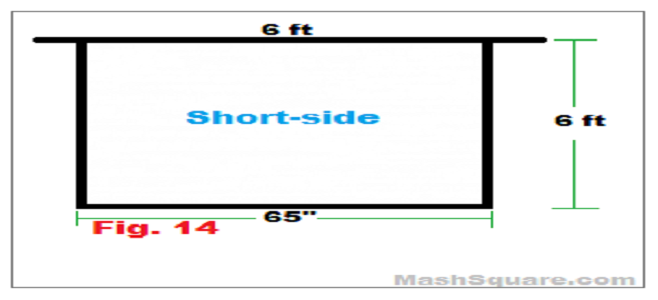
 After securing the back side wall frame and front side wall frame to the foundation, time to build the shorter side wall frames. Basically, build two identical wall frames with same dimensions shown on Fig. 14.
One thing you may have noticed, the shorter sides are 1.5-inch higher than the longer sides. That is fine! Continue with the instructions and everything will fall in place at the end by adding 2-in x 4-in x 10-ft stud to fill in the 1.5-inch gap. That should make the rectangular frame 6-ft high all around.
Materials needed (for both sides):
- 14 (2-in x 4-in x 6-ft) – standard wood (7 for each frame)
- Corner metal braces – optional
 Similarly to the construction of back and front side walls, the width wall frames should look like Fig. 15. Build them on a flat surface and once they are completed, secure them to the foundation.
If you built them according to the dimensions given of provided figures throughout this tutorial, the top part of the shorter side frames should fit nicely on the corners of the long sides. At this point secure them using few screws first, then you can use additional nails if needed.
You have came along way which is awesome! You should have a nice looking rectangular frame now. Here is a compiled full-size figure of all figures used to frame the shorter side walls.
Now that you have secured all wall sides, continue on to constructing the roof frame.
 After securing the back side wall frame to the foundation, time to build the front side wall frame.
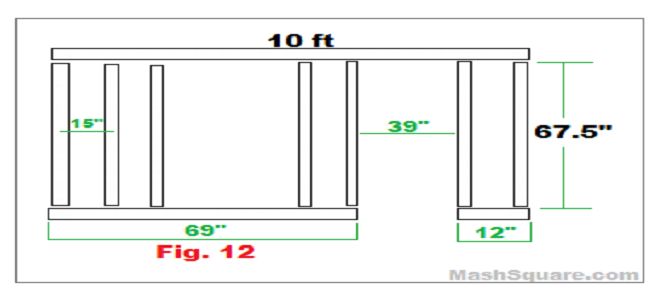
Similarly to the construction of the back side, as shown on Fig. 12. It can be built on a flat surface and once the frame is completed, it can be attached to the foundation.
The dimensions of your shed may differ depending on the building size. It is very important to cut the wood to the exact dimensions, especially that the door and window will be installed on the front side wall. The opening for the door should be exactly 39-inch as shown on Fig. 12. Once the wall frame is constructed and ready, attach it to the foundation in the same manner like the back side.
Materials needed (same materials):
- 2 (2-in x 4-in x 10-ft) – standard wood
- 9 (2-in x 4-in x 6-ft) – standard wood
- Corner metal braces – optional
 Similar to the framing of the long-side wall, the walls in general follow the same procedure of construction with respect to sizes as shown on Fig. 13.
Even though the materials above lists a total of nine stud joists, only seven of them were used while constructing the front side wall frame. The other two studs are to be used to double the door frame as shown on Fig. 13. Once you install the the two studs as shown on the figure, you should have 36-inch (3-feet) left for the door.
Now that the front side frame is built and secured, to see a compiled drawings of all figures used for planning the front side wall, or continue to building a frame for the shorter side/width wall.
 Now that the foundation is ready, it is time to frame the walls of the building. Starting with the longer side (back-side) as shown on Fig. 6. It can be built on the yard and once the frame is completed, it can be attached to the foundation. It is probably the easiest was for a beginner.
- 2 (2-in x 4-in x 10-ft) – standard wood
- 9 (2-in x 4-in x 6-ft) – standard wood
- Corner metal braces – optional
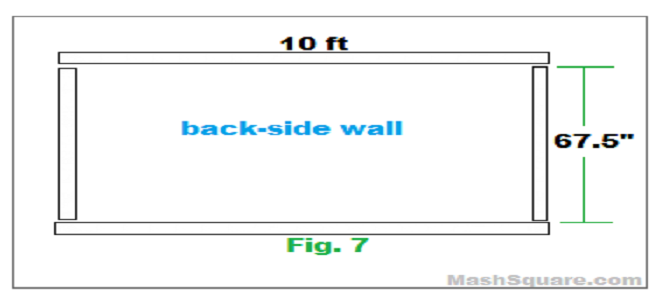
 Similar to the framing of the foundation, the walls in general follow the same procedure of construction with respect to sizes as shown on Fig. 7. The dimensions of your shed may differ depending on the building size. The length and width given on these figures apply only to the shed described in this tutorial.
Once you construct the back-side wood frame using the instructions above, you will need someone to help you carrying it and securing it to the foundation. Install it exactly on the edge without leaving any space. 
Now that the back-side frame is built and secured, to see a compiled drawings of all figures used for planning the back side wall, or continue to building a frame for the front side wall.
 Once the cement mix dries, double check if the frame is leveled before adding the remaining six joists. It is recommended to space the joists as shown on Fig. 4. Starting from the edge of the first joist, measure 15-in to the center of the second joist and then the space should be 15-in from center-to-center for the rest of the joists. Use nails or screws to attach the joists. However, you should use screws to insure the foundation frame does not shift and remain balanced.
 Once you are done installing the supporting joists, you should have a frame looking like Fig. 5.
Using the 4-ft x 8-ft standard plywood, cut them as needed to install the shed floor. You may notice, after installing the plywood, that only one layer of flooring does not feel sturdy. No worries! A double flooring has been accounted for in the materials. Do NOT install a second layer of the plywood yet. You may install a second layer once the wall frames are built and attached to the foundation.
See a compiled drawings of all figures used for planning the foundation, or continue to building back side frame.

Now that you are ready to start building your shed, have you decided where to build it at?
In many cases, most people build sheds on backyards but it all really depends on your lot.
There are few things you should check first before deciding on the location of your shed such as how far your shed should be from the borderline of your lot. It is required in some counties to build a shed at least 6-feet away from the borderline. At the same time, if you have homeowners’ association (HOA) in your community, there might be additional restrictions. It is always best to do your homework ahead of time before buying any power tools or building materials.
It is recommended to build the shed on a flat surface but you can build it anywhere. The most important thing is making a well-balanced foundation. Using concrete blocks help alleviate the foundation few inches off the ground. The best part of the concrete block shown above is that it is made to fit 1.5-inch wood making if very ideal option for the foundation studs.
 For 6 ft x 10 ft shed, place concrete blocks evenly spaced. Now, build the exterior frame of the foundation according to the dimensions show on Fig. 1. It is very important that you structure the frame of the foundation perfectly cut to exact dimensions.
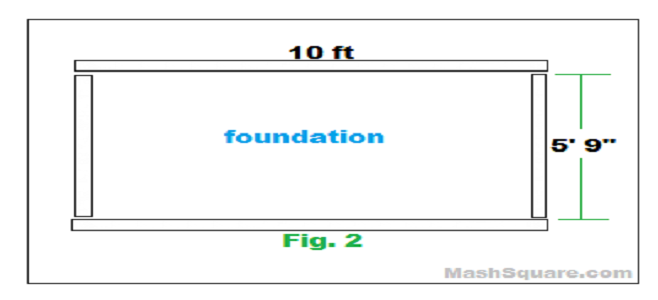
 Referring to Fig. 2 now, since the studs are 1.5-inch wide, the 10-inch studs extending along the longer sides supply 3-inches to the width, meaning the studs along the shorter sides should be 5’9″ long and not 6-ft. After making the rectangular frame, it is time to place it on the concrete blocks and using the level to insure the frame are balanced from all sides. No need to rush into building the shed without making sure the foundation is well balanced.
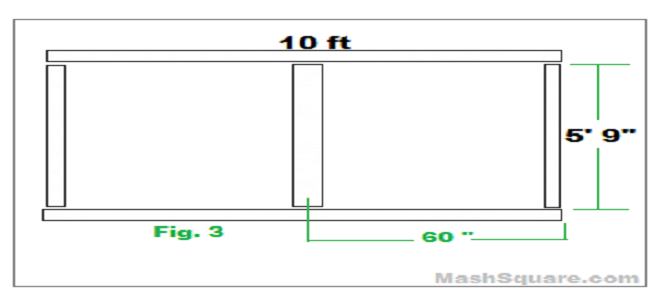
 Perhaps adding the center piece stud should help insuring the foundation is balanced. Refer to Fig. 3 which shows an addition of a center stud. Four of the concrete blocks should be placed under the frame corners and two concrete blocks in the center along the 10-inch sides. You may double check with the level again to make sure the frame is perfectly balanced. If so, mix the bag of the cement mix with water and fill around the frame to secure it. Use any strong tape around the concrete blocks to hold the cement in place till it dries. Take a break for about 24-hours to let the concrete hold nicely.
See a compiled drawings of all figures used for planning the foundation, or continue to the next step of framing the foundation.